Blog Index


Blog Comments

Secure E-mail

myfootdoctor@adlerpodiatry.com

First Name *
Last Name *
Blog Comments *


reCAPTCHA demo: Simple page


Verruca Plantaris: Understanding and Treating Plantar Warts


Verruca plantaris, commonly known as plantar warts, is a pesky and often painful foot condition that can affect anyone. These small, benign growths may seem harmless, but they can cause discomfort and inconvenience. At Adler Podiatry, we understand the impact that plantar warts can have on your daily life and are here to provide you with the knowledge and treatment options you need to address this common foot problem.

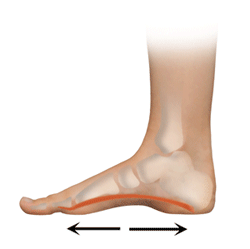
Plantar warts are a type of skin growth caused by the human papillomavirus (HPV). They typically appear on the soles of the feet, hence the name "plantar" warts. These warts are characterized by their rough, grainy texture and can often have small black dots in the center, which are clotted blood vessels. While they are usually not a serious medical concern, they can be painful, especially when they develop on weight-bearing areas of the foot.

Plantar warts are highly contagious, and they can be contracted through direct or indirect contact with the virus. Common ways in which they can be transmitted include: * Walking barefoot in public places such as locker rooms, swimming pools, and communal showers. * Sharing towels, socks, or shoes with someone who has plantar warts. * Scratching or picking at an existing wart, which can spread the virus to other parts of your foot. Several factors can increase your risk of developing plantar warts: * Weakened Immune System: People with weakened immune systems, such as those with autoimmune disorders or on immunosuppressive medications, are more susceptible to plantar warts. * Frequent Foot Moisture: Prolonged exposure to moist environments can make the skin more susceptible to the virus. * Skin Abrasions: Open cuts or skin abrasions on the soles of the feet provide an entry point for the virus. Symptoms The symptoms of plantar warts can vary, but common signs to look out for include: * A small, fleshy growth on the bottom of the foot. * Rough, grainy texture on the surface. * Pain or tenderness when walking or standing, especially if the wart is located on a pressure point. * Black dots (clotted blood vessels) within the wart.

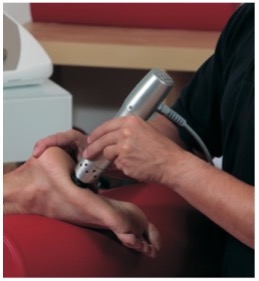
Plantar warts can be stubborn and may not go away on their own. At Adler Podiatry, we offer a range of effective treatment options to address this condition: * Topical Medications: Over-the-counter wart treatments containing salicylic acid can be effective in gradually wearing down the wart. Our podiatrists can recommend the right products and provide guidance on their use. * Cryotherapy: Cryotherapy involves freezing the wart with liquid nitrogen to destroy the affected tissue. This is typically done in a clinical setting. * Prescription Medications: In some cases, your podiatrist may prescribe stronger medications or topical treatments to address the wart. * Surgical Removal: For stubborn or painful warts, surgical removal may be necessary. This can include excision, laser therapy, or electrocautery.

Prevention is always the best strategy when it comes to plantar warts. Here are some steps you can take to reduce your risk of contracting or spreading the virus: * Avoid walking barefoot in public places and wear flip-flops or shower shoes in communal areas. * Keep your feet clean and dry. Dry feet are less likely to develop warts. * Don't share towels, socks, or shoes with someone who has plantar warts. * Avoid picking or scratching at existing warts, as this can spread the virus to other areas of your foot.

Plantar warts can be a nuisance, but with the right knowledge and expert care from Adler Podiatry, you can effectively manage and treat this common foot condition. If you suspect you have plantar warts or are experiencing discomfort in your feet, don't hesitate to seek professional help. Our skilled podiatrists are here to provide you with the guidance and treatment you need to get back on your feet comfortably and confidently.


Understanding Metatarsal Pain: Causes, Symptoms, and Treatment Options


Metatarsal pain, also known as metatarsalgia, is a common foot condition that can affect people of all ages. If you've ever experienced discomfort or pain in the ball of your foot, you might be dealing with metatarsal pain. At Adler Podiatry, we understand the importance of addressing and managing metatarsal pain effectively. In this blog, we will explore the causes, symptoms, and treatment options for metatarsal pain to help you better understand this condition and find relief.

Understanding Metatarsal Pain: The metatarsals are the long bones in the front of your foot that connect your toes to the midfoot. Metatarsal pain typically occurs in the area just behind the toes, known as the ball of the foot. It can manifest as a burning, aching, or sharp pain and may be aggravated when walking, running, or standing for extended periods.

Causes of Metatarsal Pain: * Overuse and Excessive Pressure: One of the most common causes of metatarsal pain is excessive pressure on the metatarsal heads, often due to activities that involve high-impact movements like running or jumping. * Ill-fitting Footwear: Wearing shoes that do not provide proper support or have narrow, high-heeled designs can contribute to metatarsal pain. * Foot Deformities: Conditions such as bunions, hammertoes, or high arches can alter the distribution of pressure on the metatarsals, leading to pain. * Morton's Neuroma: This is a condition where a benign growth of nerve tissue occurs between the third and fourth toes, leading to pain and discomfort in the metatarsal region. * Arthritis: Osteoarthritis or rheumatoid arthritis can lead to inflammation and pain in the metatarsal joints.

Symptoms of Metatarsal Pain: Metatarsal pain can present with a variety of symptoms, including: * Pain in the ball of the foot. * A burning or aching sensation. * Discomfort that worsens with activity. * Swelling and inflammation. * Numbness or tingling in the toes. * Difficulty walking or putting weight on the affected foot.

Treatment Options: * Rest: Taking a break from activities that exacerbate the pain and allowing your foot to rest is often the first step in managing metatarsal pain. * Proper Footwear: Wearing supportive and well-fitting shoes can significantly reduce metatarsal pain. Look for options with cushioning and arch support. * Orthotic Insoles: Custom or over-the-counter orthotic insoles can provide extra cushioning and support to alleviate pressure on the metatarsals. * Physical Therapy: Physical therapy exercises can help strengthen the foot muscles and improve your gait, reducing metatarsal pain over time. * Medications: Non-steroidal anti-inflammatory drugs (NSAIDs) can help relieve pain and reduce inflammation in the affected area. * Corticosteroid Injections: In some cases, a corticosteroid injection may be recommended to reduce inflammation and pain. * Surgical Options: When conservative treatments do not provide relief, surgery may be necessary to correct structural issues or remove neuromas.

Conclusion: Metatarsal pain can be a challenging and discomforting condition, but with the right treatment and care, it can often be managed effectively. If you're experiencing metatarsal pain, it's essential to consult a podiatrist at Adler Podiatry for a proper diagnosis and a personalized treatment plan. With the right approach, you can get back to enjoying your daily activities without foot pain holding you back.


Prevention and Treatment of Ingrown Toenails


Ingrown toenails are among the most common foot problems. Often ingrown toenails are caused by cutting the toenail too short, rounding the corners or leaving a pointed edge at the end of the toenail. If left untreated the toenail can puncture the skin and become infected.

Most ingrown toenails occur in the great toenail and not the smaller toenails. Children appear to have a higher incidence of ingrown toenails than adults.

When treating children the challenge is to make the experience non-traumatizing. Prior to numbing the toe a Dermajet® is used which makes the "needle stick" painless. After removing the ingrown toenail, a chemical can be applied to the nail root which prevents the ingrown toenail from regrowing and helps keep the toe numb.

Patients are comfortable during and after the procedure and return to normal activites the next day. Children do so well that many parents schedule an appointment to have their ingrown toenail treated.

Ingrown Toenails

General Information Video


Using Lasers to Treat Toenail Fungus

Onychomycosis is the medical term for toenail fungus. It's estimated that approximately 10% of the population have toenail fungus. How does fungus infect the toenail and can you prevent it? What are the treatments and which treatment is the best and the safest? Can lasers cure toenail fungus?

Fungus is a living organism. It's difficult to completely kill fungus on the skin with topical medications. mild nail fungus 
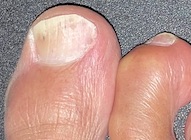
Topical chemicals and medications i.e. alcohol, Vicks VapoRub,® Lamisil Cream® and Tinactin Powder® are able to suppress fungal growth.

Fungus lives in the skin on your foot. It can gradually spread into the skin under your toenail. As the skin in the nail bed becomes infected, cells binding the toenail to the nailbed die and the toenail separates from the nailbed. As the toenail continues to grow, it "piles up on itself" gradually thickening.

To be effective the treatment needs to get through the toenail to kill or suppress the fungus, without harming the nail bed. nail fungus 
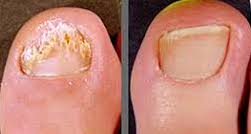
Non-prescription antifungals may not penetrate the toenail or may damage the cells of the nailbed. Topical prescription medication i.e. Ciclopirox® and Jublia® may penetrate the toenail, but may not completely kill the fungus.

Oral medications i.e. Lamisil® can be effective at treating onychomycosis. However there is a risk of liver problems. More recently, there is concern that not completely killing the fungus could lead to "super bugs" resistant to treatment.

Lasers can penetrate the toenail. Low wavelength lasers generate minimal heat making the treatment painless and limiting damage to the cells of the nailbed. Following laser treatment, topical medication should be used as the toenail grows out. Periodic application of topical medication maybe necessary to prevent reinfecton.


Heel Pain: Treating Fasciitis and More

Plantar Fasciitis is a common cause of heel pain and affects approximately 15% of the population. If you've experienced heel pain, you know it can be disabling. The most common symptom is pain when first standing up in the morning and after rest. The pain is usually confined to the inside-bottom of the heel. There's usually no pain when resting or at night.

Plantar fasciitis is “not” an inflammation. It's a strain of the small muscles in the arch of your foot. The plantar fascia is a thick ligament starting at your heel covering the bottom of your foot. It removes the strain from the small muscles on the bottom of the foot. When walking, if the foot flattens excessively, the muscles in the bottom of the foot gradually fatigue. When muscles fatigue, they tighten at rest. Suddenly stretching a tight muscle when standing after rest, causes pain i.e. when getting up in the morning.

PF-animation.gif

Heel Spurs are commonly seen on X-rays of patients with fasciitis. The plantar fascia is a thick ligament that attaches to the heel. As the foot flattens, the fascia pulls away from the heel. Micro tears occur which calcify. The heel spur isn't sticking into you heel, it's embedded in the fascia. It's not unusual to see a spur in a foot without heel pain.

Causes of plantar fasciitis include weight gain and worn out shoes. Increased weight causes the foot to flatten, stretching the muscles in the arch.

Wearing worn out shoes allows your foot to flatten (pronate) excessively when standing and walking. The small muscles in the foot work overtime to stabilize the foot. The muscles gradually fatigue from overuse.

Less common causes of heel pain include the following: Plantar Fasciitis, Posterior Tibial Dysfunction, Achilles Tendinopathy, Bursitis, Nerve Entrapments and Stress Fractures.

The following video discusses some of the causes and treatments for Heel Pain - Plantar Fasciitis

Treatment of Heel Pain It's very important when heel pain starts to check and replace any shoe with signs of wear or breakdown. It's critical to support the arch to relieve strain on the small muscles attached to the heel. Tradition and effective treatments include Custom Orthotics, cortisone injections and physical therapy. Surgery is rarely necessary.

Laser Therapy promotes cellular regeneration, reducing pain, swelling and inflammation while promoting healing.

Radial_Shockwave

Radial Shockwave Therapy is approximately 80% effective at treating plantar fasciitis. When you experience chronic pain, your body no longer recognizes that there is an injury to that area. As a result, it shuts down the healing process and you feel no relief.The ballistic sound waves of the EnPuls penetrate deep through your soft tissue, causing a microtrauma or new inflammatory condition to the treated area. Once this occurs, it then triggers your body's natural healing response once again. The energy emitted also causes the cells in the soft tissue to release certain bio-chemicals that intensify the body's natural healing process. These bio-chemicals allow for the building of an array of new microscopic blood vessels in the soft tissue.

There is a relationship between the length of time the problem has been present and the amount of time it takes for the problem to resolve. The sooner you seek medical care, the faster the problem is likely to resolve.


Get the Right Shoe for Your Activity

Choosing the right shoes for various sports is crucial to prevent injuries and optimize performance. Adler Podiatry Clinic, as a specialized clinic, would likely recommend the following types of shoes for different sports:

Know Your Foot Type: Determine your foot type, which can be flat (overpronation), neutral, or high-arched (underpronation/supination). This can be done at a specialty running store or with the help of a podiatrist. Your foot type will guide your choice of shoe.

Understand Your Running Style: Consider the type of running you do. Are you a long-distance runner, a sprinter, a trail runner, or a casual jogger? Different running styles may require different features in a shoe.

Get a Professional Gait Analysis: Visit a specialty running store or a podiatrist for a gait analysis. This involves observing your running stride to identify any irregularities or pronation patterns. This will help in determining the level of stability and cushioning you need.

Measure Your Foot Size: Have your feet measured while standing. Running shoes should provide ample room for your toes and a snug fit around the heel and midfoot. Measure both feet, as one foot is often slightly larger than the other.

Shop in the Afternoon: Your feet tend to swell throughout the day, so it's best to shop for running shoes in the late afternoon or evening when your feet are at their largest./p>

Try on Several Brands and Models: Don't stick to a specific brand or model. Different brands and models have varying fits and feel. Try on multiple options to find the one that feels most comfortable.

Test the Fit: Ensure that there is about a thumb's width of space between your longest toe (usually the big toe) and the front of the shoe. Make sure the shoe doesn't feel too tight or too loose. Your heel should fit snugly but not be squeezed

Quality of Shoe: The better made running shoes are light weight, have a firm sole, rigid heel counter and removable liner. The lighter the shoe the less energy you expend when running. The firm sole helps restrict pronation. A removable liner allows for an orthotic, if necessary. The rigid heel counter helps control both pronation and supination.

Consider the Arch Support: If you have flat feet or high arches, look for running shoes that provide appropriate arch support. Some shoes come with built-in arch support, while others may require custom orthotics.

Think About Terrain: If you run on different surfaces (e.g., road, trail, track), choose a shoe designed for the specific terrain. Trail running shoes have more aggressive tread, while road shoes are designed for pavement.

Consider Your Budget: Running shoes come in various price ranges. Set a budget, but keep in mind that investing in a quality pair of running shoes is essential for injury prevention and performance.

Test Run: If possible, take a short jog or run in the store to assess how the shoes feel when in motion.

Replace Your Shoes: Running shoes have a limited lifespan, usually around 300-500 miles (or as recommended by the manufacturer). Regularly replace your running shoes to maintain their performance and support.

Conclusion: Selecting the correct running shoe is a personal process, and what works for one person may not work for another. Consulting with a running specialist, such as a podiatrist or a knowledgeable salesperson at a trusted running store, can be invaluable in making an informed choice. However, if your foot, leg, knee, hip or back problem doesn't appear to respond after replacing the shoe, it's time to call Adler Podiatry Clinic.

Get the Right Shoe for Your Activity

Choosing the right shoes for various sports is crucial to prevent injuries and optimize performance. Adler Podiatry Clinic, as a specialized clinic, would likely recommend the following types of shoes for different sports:

Running: Running shoes are designed to absorb shock and provide cushioning, making them ideal for runners. Look for shoes with proper arch support and cushioning to reduce the risk of injuries like shin splints or plantar fasciitis.

Basketball: Basketball shoes offer ankle support and cushioning to handle the high-impact nature of the sport. They should have good traction for quick lateral movements and jumps.

Tennis: Tennis shoes are designed to provide stability, as players frequently make lateral movements. They have durable outsoles to withstand abrasive court surfaces and should offer good arch supports.

Soccer: Soccer cleats are necessary for traction on the field. Turf shoes are another option for artificial turf surfaces. Both should fit snugly and offer some cushioning for comfort.

Football: Football cleats should provide excellent traction on grass and have a high-top design to support the ankle during rapid direction changes and tackles.

Cross-Training: Cross-training shoes are versatile and suitable for a variety of activities. They offer a balance of cushioning, support, and flexibility, making them ideal for gym workouts and classes.

Golf: Golf shoes typically feature spikes or cleats for traction on the course. They should provide good arch support and be comfortable for walking long distances.

Hiking: Hiking boots or shoes are designed for outdoor activities and should provide ankle support, good traction, and protection from rugged terrain. They are often waterproof and insulated.

Cycling: Cycling shoes come in various types, such as road, mountain, and indoor cycling shoes. They have stiff soles to optimize power transfer and usually feature a clipless pedal system.

Volleyball: Volleyball shoes should offer good lateral support and cushioning for jumping and landing. They are often lightweight and have non-marking outsoles for indoor courts.

Track and Field: Track spikes and field event shoes are designed for specific events. Sprinting spikes have minimal cushioning for speed, while field event shoes have more support and cushioning for jumping and throwing events.

Conclusion: When recommending shoes for various sports, it's essential to consider your foot type, gait, and any existing foot conditions. Custom orthotics or insoles can be used to treat specific biomechanical issues. However, when your foot, leg, knee, hip or back problem doesn't respond to changing the shoe, it's a good idea to consult a podiatrist at Adler Podiatry Clinic.


Selecting the Best Running Shoe

Selecting a good running shoe is crucial for your comfort, performance, and injury prevention. Here are some steps to help you choose the right running shoe:

Know Your Foot Type: Determine your foot type, which can be flat (overpronation), neutral, or high-arched (underpronation/supination). This can be done at a specialty running store or with the help of a podiatrist. Your foot type will guide your choice of shoe.

Understand Your Running Style: Consider the type of running you do. Are you a long-distance runner, a sprinter, a trail runner, or a casual jogger? Different running styles may require different features in a shoe.

Get a Professional Gait Analysis: Visit a specialty running store or a podiatrist for a gait analysis. This involves observing your running stride to identify any irregularities or pronation patterns. This will help in determining the level of stability and cushioning you need.

Measure Your Foot Size: Have your feet measured while standing. Running shoes should provide ample room for your toes and a snug fit around the heel and midfoot. Measure both feet, as one foot is often slightly larger than the other.

Shop in the Afternoon: Your feet tend to swell throughout the day, so it's best to shop for running shoes in the late afternoon or evening when your feet are at their largest./p>

Try on Several Brands and Models: Don't stick to a specific brand or model. Different brands and models have varying fits and feel. Try on multiple options to find the one that feels most comfortable.

Test the Fit: Ensure that there is about a thumb's width of space between your longest toe (usually the big toe) and the front of the shoe. Make sure the shoe doesn't feel too tight or too loose. Your heel should fit snugly but not be squeezed

Quality of Shoe: The better made running shoes are light weight, have a firm sole, rigid heel counter and removable liner. The lighter the shoe the less energy you expend when running. The firm sole helps restrict pronation. A removable liner allows for an orthotic, if necessary. The rigid heel counter helps control both pronation and supination.

Consider the Arch Support: If you have flat feet or high arches, look for running shoes that provide appropriate arch support. Some shoes come with built-in arch support, while others may require custom orthotics.

Think About Terrain: If you run on different surfaces (e.g., road, trail, track), choose a shoe designed for the specific terrain. Trail running shoes have more aggressive tread, while road shoes are designed for pavement.

Consider Your Budget: Running shoes come in various price ranges. Set a budget, but keep in mind that investing in a quality pair of running shoes is essential for injury prevention and performance.

Test Run: If possible, take a short jog or run in the store to assess how the shoes feel when in motion.

Replace Your Shoes: Running shoes have a limited lifespan, usually around 300-500 miles (or as recommended by the manufacturer). Regularly replace your running shoes to maintain their performance and support.

Conclusion: Selecting the correct running shoe is a personal process, and what works for one person may not work for another. Consulting with a running specialist, such as a podiatrist or a knowledgeable salesperson at a trusted running store, can be invaluable in making an informed choice. However, if your foot, leg, knee, hip or back problem doesn't appear to respond after replacing the shoe, it's time to call Adler Podiatry Clinic.


Treating Achilles Tendon Injuries

Treatment for Achilles tendon injuries can vary depending on the severity and type of injury. Initially treatment of the injury includes:

Rest: Rest is often the first step in treating Achilles tendon injuries. Avoid activities that worsen the pain, and give your tendon time to heal.

Ice: Applying ice to the injured area can help reduce swelling and pain. Use a cold pack or ice wrapped in a thin cloth for 15-20 minutes at a time, several times a day.

Compression: Compression can help reduce swelling and provide support to the injured area. You can use a compression bandage or brace, but be sure not to wrap it too tightly.

Elevation: Elevating the injured leg can also help reduce swelling. Prop your leg up on a pillow when resting or sleeping.

Non-Steroidal Anti-Inflammatory Drugs (NSAIDs): Over-the-counter NSAIDs like ibuprofen or naproxen can help reduce pain and inflammation. However, because these medications have side effects, always consult with a healthcare professional before using them.

Professional Care: When your pain and swelling do not respond to Rest, Ice, Compression and Elevation, you should seek Professional Care. Physical examination of the injury with possible MRI may be necessary to accurately evaluate the severity of the injury and recommend proper treatment.

Immobilization: Using a cast or walking boot may be necessary to immobilize the ankle and allow the tendon to heal.

Physical Therapy: Physical therapy can be beneficial for Achilles tendon injuries. A physical therapist can help you with specific exercises and stretches to improve flexibility and strength and guide you through your rehabilitation.

Eccentric Strengthening: Eccentric exercises, such as heel drops, are often recommended for Achilles tendon injuries. These exercises involve lengthening the tendon while it's under load and can help with tendon healing and strengthening.

Orthotics and Shoe Modifications: Custom orthotic inserts or changes in footwear can provide better support and reduce strain on the Achilles tendon.

Heel Lifts: Heel lifts or inserts can help relieve strain on the Achilles tendon and provide a slight heel raise, which can reduce tension on the tendon.

Platelet-Rich Plasma (PRP) Therapy: Some individuals with Achilles tendon injuries opt for PRP therapy, which involves injecting a concentrated solution of their own blood platelets into the injured area to promote healing.

Surgery: When the Achilles tendon is partially or completely torn, severely damaged or if non-surgical methods are ineffective, surgical intervention may be necessary. Surgery can involve repairing the tendon or removing damaged tissue.

It's essential to consult a healthcare professional for a proper diagnosis and treatment plan tailored to your specific injury. They can help determine the most suitable approach based on the extent and type of your Achilles tendon injury. Early intervention and following the recommended treatment plan can help improve your chances of a full recovery.


Exercise Improves Balance and Strength

Exercise 1: Single Limb Stance It’s best to start off with a simple balance exercise for seniors. Here’s how you do this one: stand behind a steady, solid chair (not one with wheels), and hold on to the back of it. Lift up your right foot and balance on your left foot. Hold that position for as long as you can, then switch feet. The goal should be to stand on one foot without holding onto the chair and hold that pose for up to a minute.

Exercise 2: Walking Heel to Toe You might read this and wonder, “How is walking an exercise to improve balance?” This exercise makes your legs stronger, which enables you to walk without falling. Put your right foot in front of your left foot so that the heel of your right foot touches the top of the toes of your left foot. Move your left foot in front of your right, putting your weight on your heel. Then, shift your weight to your toes. Repeat the step with your left foot. Walk this way for 20 steps.

Exercise 3: Rock the Boat Stand with your feet apart, so that the space between them is the same width as your hips. Make sure both feet are pressed into the ground firmly. Stand straight, with your head level. Then, transfer your weight to your right foot and slowly lift your left leg off the ground. Hold that position for as long as possible (but no more than 30 seconds). Slowly put your foot back onto the ground, then transfer your weight to that foot. Slowly lift your opposite leg. Start by doing this exercise for balance five times per side, then work your way up to more repetitions.

Exercise 4: Clock Reach You’ll need a chair for this exercise. Imagine that you are standing in the center of a clock. The number 12 is directly in front of you and the number 6 is directly behind you. Hold the chair with your left hand. Lift your right leg and extend your right arm so it’s pointing to the number 12. Next, point your arm towards the number three, and finally, point it behind you at the number 6. Bring your arm back to the number three, and then to the number 12. Look straight ahead the whole time. Repeat this exercise twice per side.

Exercise 5: Back Leg Raises This strength training exercise for seniors makes your bottom and your lower back stronger. Stand behind a chair. Slowly lift your right leg straight back – don’t bend your knees or point your toes. Hold that position for one second, then gently bring your leg back down. Repeat this ten to 15 times per leg.

Exercise 6: Single Limb Stance with Arm This balance exercise for seniors improves your physical coordination. Stand with your feet together and arms at your side next to a chair. Lift your left hand over your head. Then, slowly raise your left foot off the floor. Hold that position for ten seconds. Repeat the same action on the right side.

Exercise 7: Side Leg Raise You’ll need a chair for this exercise to improve balance. Stand behind the chair with your feet slightly apart. Slowly lift your right leg to the side. Keep your back straight, your toe facing forward, and stare straight ahead. Lower your right leg slowly. Repeat this exercise 10 to 15 times per leg

Exercise 8: Balancing Wand This balance exercise for seniors can be performed while seated. You’ll need a cane or some kind of stick. A broomstick works well for this – just remove the broom’s head before you start. Hold the bottom of the stick so that it’s flat on the palm of your hand. The goal of this exercise is to keep the stick upright for as long as possible. Change hands so that you work on your balance skills on both sides of your body.

Exercise 9: Wall Pushups As long as you’ve got a wall, you can do this strength training exercise for seniors. Stand an arm’s length in front of a wall that doesn’t have any paintings, decorations, windows or doors. Lean forward slightly and put your palms flat on the wall at the height and width of your shoulders. Keep your feet planted as you slowly bring your body towards the wall. Gently push yourself back so that your arms are straight. Do twenty of these.

Exercise 10: Marching in Place Marching is a great balance exercise for seniors. If you need to hold onto something, do this exercise in front of a counter. Standing straight, lift your right knee as high as you can. Lower it, then lift the left leg. Lift and lower your legs 20 times.

Exercise 11: Toe Lifts This strength training exercise for seniors also improves balance. You’ll need a chair or a counter. Stand straight and put your arms in front of you. Raise yourself up on your toes as high as you can go, then gently lower yourself. Don’t lean too far forward on the chair or counter. Lift and lower yourself 20 times.

Exercise 12: Shoulder Rolls This is a simple exercise for seniors. You can do it seated or standing. Rotate your shoulders gently up to the ceiling, then back and down. Next, do the same thing, but roll them forwards and then down.

Exercise 13: Hand and Finger Exercises The following are exercises to improve flexibility. You don’t need to stand for these. In the first exercise, pretend there’s a wall in front of you. Your fingers will climb the wall until they’re above your head. While holding your arms above your head, wiggle your fingers for ten seconds. Then, walk them back down. During the second exercise, touch your hands while they’re behind your back. Reach for your left hand while your right hand is behind your back. Hold that position for ten seconds, then try with your other arm.

Exercise 14: Calf Stretches These strength training exercises for seniors can be performed sitting or standing. To do calf stretches while standing, find a wall with nothing on it. Stand facing the wall with your hands at eye level. Place your left leg behind your right leg. Keep your left heel on the floor and bend your right knee. Hold the stretch for 15 to 30 seconds. Repeat two to four times per leg. If you want to stretch your calves while sitting, you’ll need a towel. Sit on the floor with your legs straight. Put the towel around the soles of your right foot and hold both ends. Pull the towel towards you while keeping your knee straight and hold it for 15 to 30 seconds. Repeat the exercise two to four times per leg.


Medical Foods Help Treat Neuropathy and Arthritis

A Medical Food “is formulated to be consumed or administered enterally under the supervision of a physician and which is intended for the specific dietary management of a disease or condition for which distinctive nutritional requirements, based on recognized scientific principles, are established by medical evaluation.”

(1988 Orphan Drug Act amended to create a statutory definition of medical food [21 USC 360ee(b)(3)])

The following video discusses Medical Foods and Diabetic Neuropathy.


© 2012 - 2024